Multi Format Content for YouTube and TikTok
YouTube - Watch this post's supporting video.
Different platforms have different needs. YouTube wants horizontal video and TikTok wants vertical video, but that’s just the tip of the iceberg.
The danger of repurposing content from one platform to another is that the you’re talking to a different audience with different expectations and context. You’re also risking shadow-bans as I’m sure YouTube has a thing to detect TikTok watermarks in uploaded videos!
Your audience will prefer to see content with the right layout and tone for their favourite platform.
Today I’ll show you three approaches I’ve taken to getting content in multiple formats.
I’m calling the first approach the Ecamm Mega-Canvas.
Option 1: Mega-Canvas
I wanted to record multiple angles and formats in a single video file that I could then edit in Final Cut and optimise for different platforms.
I used Ecamm Live but you could achieve the same thing with OBS.
Here’s the “wireframe” of my mega-canvas. It’s a 4K canvas that I can crop to get 1080p videos.

And here’s what that looked like with all the video sources. I had a wide on the iPad, a wide of myself and a wide screenshare, and then a baked-in crop to my main angle and iPad angle to rotate in to a vertical format.

We recorded for an hour, trying out lots of different ideas and then I brought it into Final Cut for editing. I created Effect presets for the different crops to speed things up.

Now it actually seems that I didn’t get around to making horizontal versions of any of these videos, so what does that tell you?
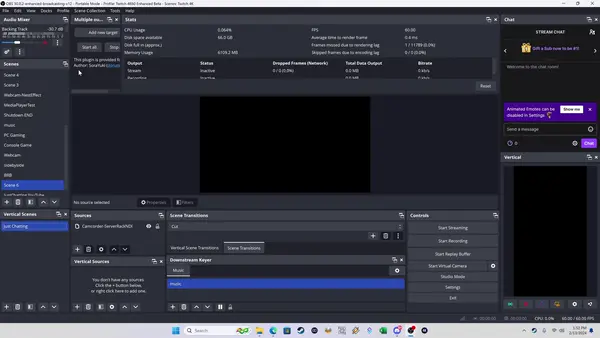
Option 2: OBS with Aitum Vertical Plugin
This lets you set up a set of secondary vertical scenes and link them to your primary scenes, so that you can simultaneously stream and record in different layouts.
Here’s EposVox setting up the scenes with the plugins. The “Just Chatting” view gets a nice big cropped-in close-up instead of being a tiny version of the wide view that works in the horizontal layout, making it better for mobile viewers who won’t be able to see as much as desktop viewers.
I was inspired by this idea and mentioned it in the Ecamm Facebook group but ended up resorting to the mega-canvas instead.
If you’d like this feature in CueCam Presenter, feel free to make a feature request, since I ended up going a different way...
Option 3: Recording Platform-Specific Takes with Editless Video Production
CueCam Presenter has an “editless video production” philosophy, where you focus on getting rich one-take recordings, baking in video clips, slides and iPad drawings into one master recording.
If you don’t get a good take, you go again, and it will probably be better than it would have been if you’d edited! Worst case, you stitch a couple of different takes. This can save HOURS of production time.
Its content-editing workflow is also presentation-agnostic.
CueCam’s presentation editor doesn’t have make you lay out as design on a canvas, you just add titles, text and attachments and let CueCam handle the layout.
The key is that CueCam Presenter creates different layouts for horizontal and vertical video from the same script.
Here’s a recent video I put on my YouTube

And then here’s the same thing on TikTok.

I had a couple of press quotes, so they looked like this on YouTube

And this on TikTok. Because it’s a live recording and I can see what I’m doing, I can move around the frame - here I’m ducking down a bit so you can still see me. If I did this with editing it would involve jump cuts or keyframing crops and zooms, making sure the timing is not creepy and awkward, adding sound effects and generally complicating the whole thing. None of this is necessary with CueCam’s editless realtime workflow.

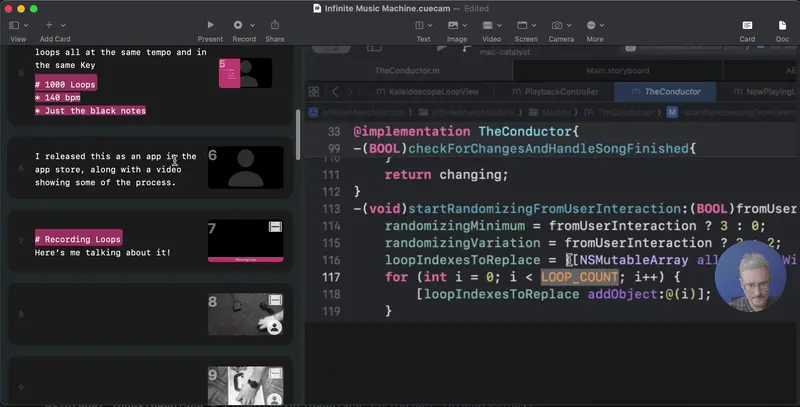
So what does it look like as a script? It’s just a bit of quotation markdown in the card alongside my teleprompter notes.

I embedded a long video and trimmed different segments.

I included a couple of screen shares.

Here’s the whole thing.
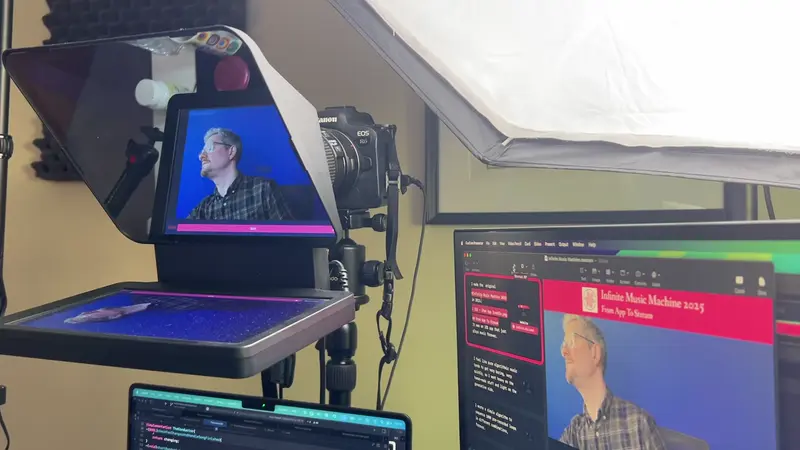
And here’s how it looks when you’re recording. You don’t need a big teleprompter set-up like this, you can do the same thing with just your Mac and iPhone using Shoot.
CueCam’s Recording Workflow
To start recording a script with CueCam press Record in the toolbar.

This will start the presentation and the recording.
CueCam enters Presentation Mode and you can click anywhere or use the arrow keys to step through cards.

If you’re using an iPhone with Shoot as your main camera, it will turn into a teleprompter.

If you have a Stream Deck, you can use this to record and navigate. You’ll even see the recording progress on the button.

When your recording is complete, you can press “Show File”, or mark the take as “Good” or “Okay”.

You can record separate layers if you want more flexibility during editing.

If you use Final Cut, you can find a Final Cut timeline in the recording’s folder.

Double click this to open your timeline in Final Cut (or right-click→ Show Package Contents if you want to import it into DaVinci Resolve or another application that support .fcpxml files).
The timeline includes isolated layers, captions and markers for each slide that you presented.

CueCam can also create a YouTube-friendly summary via Chat GPT. Just take a look in the video’s folder.

I think you’ll be surprised at how quickly you can produce high quality content this way, ready to upload to YouTube, TikTok and wherever else you want.

CueCam is free to try, with a watermark when running presentations. The Essentials plan lets you create content using your Mac, iPhone and iPad. The Suite plan unlocks your teleprompter, multi-layer timeline generation and more.